Creating a web mission
The web mission maker is used to create web missions. Anyone can create and submit a web mission, and if it's approved, earn lunar for contributing to the game. The amount of lunar varies from 5-30, depending on how well-written it is; the final amount awarded is based on Nuku's discretion (or at least, as far as I've been able to tell!). However, making a long, well-written mission with branching paths will probably earn you more lunar, but also be enjoyable for everyone to play!
Contents
Getting Started
When you first enter the mission maker, you'll see a box with four labels and dropdowns. This is where you access any missions you have started writing or that are waiting on staff approval. Below that is an empty text box for creating a new mission. Enter a name in the box to create a new mission, or choose an existing one from the dropdowns, and you'll be taken to the main mission editor screen. Be certain you have spelled the mission name correctly, because it will require a request to change!
The Editor
Now that you're in the editor itself, you can start creating your mission. A web mission is like an interactive story or choose your own adventure, and can be as simple or complex as you want.
In the title bar, you can edit the location of your mission, and the requirements for the mission to appear. The most typical requirements are level and other missions, but others may be considered. This is also where you set the description for your mission.
There are seven main blocks that make up a mission: Message, Fight, Patrol, Reward, Label, GoTo, and Prompt. You've already got one of the first type as a message from Damaged. Mission flow will go from top to bottom, unless told to do otherwise through use of the last three blocks. Create a new block by using the dropdown at the bottom that says NEW. You can rearrange blocks by clicking on the arrows along the right side, and edit each block by clicking the button.
Message
This is your basic building block, and will make up the majority of your mission. It displays whatever you enter, and supports string parsing. Go wild! However, it may be useful to separate up a particularly long story segment into various message blocks.
Fight
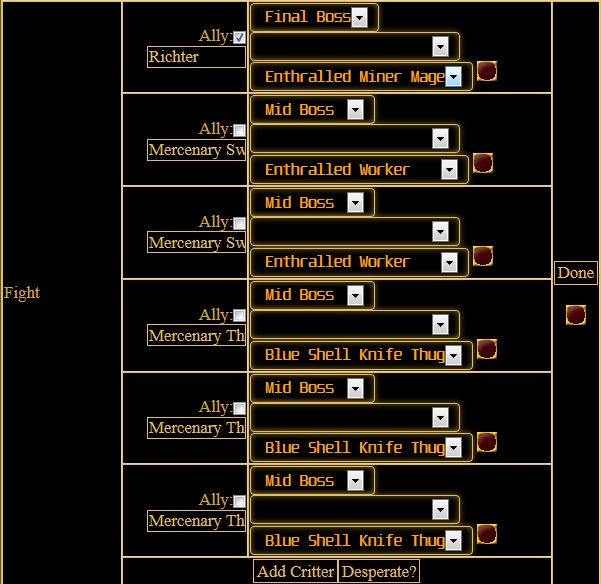
This block sets up a battle. Checking the 'Ally' box makes a critter fight on the side of the player, while 'Alias' is the name that is displayed. The dropdown boxes set the rank, or difficulty, and species of the critter, as well as any modifiers it may have such as Front and Center or Weak; these give you a large degree of customisation over the encounter. You can also mark the fight 'Desperate' to have the mission continue even if the battle is lost; these are expected to be very hard, if not impossible to win. Keep in mind that players attempting your mission may vary widely in their power level, especially if your mission's level requirement is low. Also note that monsters very widely in power; while missions are level-scaled, a creature from a high-level area will have far more tricks up its sleeve than one from a low-levelled area.
An example:
Here is can be seen that "Richter" (alias) is on the side of the player, and has the rank of "final boss" (rank) as an "enthralled miner mage" (creature). The mercenary opponents have mid-boss ranks. None of them have any pertinent templates/modifiers, though.
If you need to test a fight (for example, to check its difficulty), double click on the "fight" box when the block is not active to activate a test fight.
Patrol
This block sets up a patrol event. Players will need to fight battles while in a certain location on the web to gain points towards an objective; you can adjust the area, number of progress points and percentage chance that a defeated enemy will yield a progress point. Try to be reasonable.
Reward
This block is used to give a reward to the player. You can give crown, XP, or badges. You can ask staff to award a crafting schematic or other item as well. Try to make the reward fit the difficulty and level requirement of the mission! Remember that rewards need not be given at the end of a mission, you can give players a reward for taking a harder side branch of your mission, for example. You can also set negative crown rewards if you need your player to spend money, for example, bribing an individual.
Label
This is the first of the control blocks. It simply sets up a label, or target, for the Prompt and GoTo blocks. Enter the name, carry on. Example:
So when you use a goto or prompt block, the system will search for the "Holdon" label and go to that spot in the mission.
GoTo
This block does exactly what it says, it goes to. Enter the name of the label you want mission flow to jump to, and this block will send players to that point when encountered. Be careful not to create a loop that can't be escaped from, though, and about rewards inside loops.
Prompt
This acts like a GoTo, except it gives the player multiple options to choose from. Alias is the name of the option, Label is the name of the target label that choosing the option goes to. These also support string parsing, so you can have options that adjust to the circumstances.
That's about it! Once you're satisfied, click the Submit for Approval button and await the judgement of staff. If they decide it passes muster, congratulations! Otherwise, they may bounce it back to you for a round of revisions, with suggested changes or any problems they find. Don't despair, and don't be afraid to ask for help!
Charge
This block acts as a toll booth of sorts. In order to get past this block, the player will have to pay a certain amount of a stat; in the below example, "property" is the stat which will be paid, and "value" will be the amount that is paid. Simple as that. If you'd like to add another condition, "add charge" will input another row for you to charge the player with.
Examples of stats that can be charged are:
- Reward tokens
- freecred (crowns) (for bribes, etc)
- Patrol (patrol points) (to represent time or effort)
These are more common examples. Technically, though, any stat can be charged, including lunars, proficiencies, and levels! However, you ought to have a good reason in order to demand the player give up these things, and everything is subject to approval from staff.
String Parsing in missions
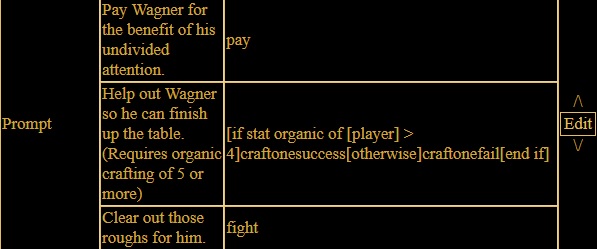
String parsing in missions can be used to check for various requirements, such as proficiency levels. These are most commonly used in goto and prompt blocks, although you can also do this "softly" by hiding hints to correct choices in message blocks. Here is an example:
Here, if the player picks the middle option, their organic crafting skill will be checked and if found to be more than four, will be taken to the "craftonesuccess" label. Otherwise, they will be taken to the "craftonefail" label.
When used in a goto block, the string parsing is automatically run once the player hits that block. In this case, the nested if operations check for a scavenger skill of two or more, then one or more, and finally if the player does not have the scavenger combat skill. The player is then directed to the "searchfast", "searchmedium" or "searchslow" labels accordingly.
Remember that when checking against proficiencies such as fire magic, your total trained skill will be checked, even if you do not currently have it because of your soul configuration. So let's say you play a priest and train direction up to 30, then switch souls to fighter which has a maximum of 10 at level 35, or windrunner, which does not have the proficiency at all. You will still use the value of 30 in web mission checks, so keep this in mind when designing missions. However, this does NOT apply to combat skills such as readiness or health; these are checked against your current soul.
Generally, if it can be +proven, it can be checked. Be creative!
String Parsing Variables
Recalling certain stats of a player can help make the mission more personal for players. Here's some variables, with Bob the clever-clan fox man joining us for some examples!
[player] - When placed outside of any other checks or commands, this will simply display the player's name. (e.g., "Hello, Bob.")
[stat species of [player]] - Display the species of player. e.g., "Hello, fox.")
[stat faction of [player]] - Display the clan of a player. (e.g., "Hello, clever folk.")
[stat sex of [player]] - Display the sex (male/female) of a player. (e.g., "Hello, male.")
Mission Requirements
Mission requirements generally come in three forms: restriction by location, by level, or by badge. Example:
Here, by setting the location, you can make the mission available only if the player is in the correct area on the web (in this case, Drytongue flats). "Level/X" in the requirements box will require the player to be of X level before the mission can be attempted (28, in this case). Furthermore, "Badge/X" will restrict the mission to only players who have the badge named X; this can be used to create quest lines or even forks. To create a fork, simply have two different outcomes of a mission give differing badges, then create different badge requirements. However, since missions are not repeatable, it may be best to inform players that they are making a permanent decision. To join up a quest fork, simply have both missions give the same badge, and then make the next mission in line require that badge.
If you would like a mission to have multiple requirements, simply separate them with a colon as such: (blah/blah:blah2/blah2)
Tips
- Proofread! Check your spelling and your grammar.
- Read through the mission as if you were playing it, to make sure it makes sense when it's all put together.
- Give players options. Don't force them to take actions that may be against their character's nature. Not everyone is going to take advantage of that shy puppy, or execute the captured spy.
- If you have branching paths, make use of GoTo and Labels to ensure proper mission flow. Make sure players can't accidentally jump between branches, and make sure the mission ends when it's supposed to. For example, at the end of each terminal branch, set a GoTo that leads to an End label placed at the very bottom of the list.
- Learn and make use of string parsing. What species is the player? Can they fly? What are they proficient in? String parsing has the answer, and it makes for a much better experience.
- Know your lore reasonably well for what you're writing. You don't want to make a major blunder!
- Plot out your mission beforehand on paper if you can. It's much easier to do that than fix mistakes and getting all confused as to what blocks lead where.
- If you have any theme questions you need clarified for your mission, be sure to check out the ask page. You may even find an idea or two there!


